Some schools offers residential facility for students those who are stdying in their school .DigitalSchool provides comprehensive software soltuions to full fill automation needs.
First of all lets configure settings for Hostel module
Goto
SETTINGS ->HOSTEL
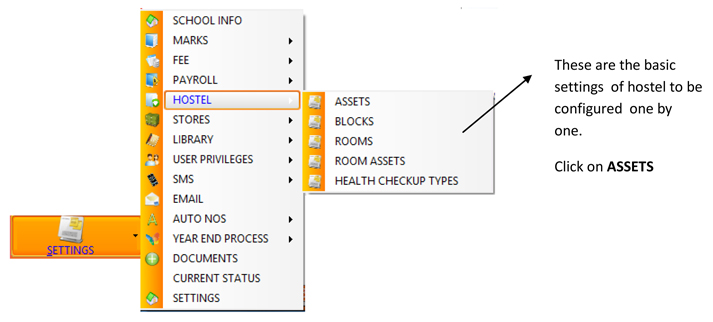
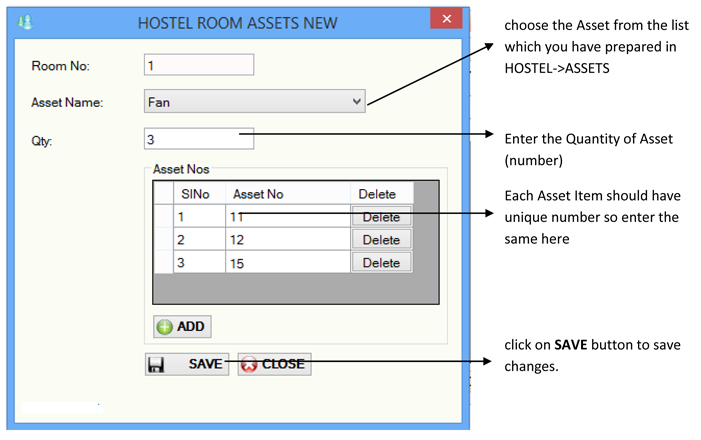
This screen is used to listout the assets that are provided to hostel rooms and value is the approximate cost of the item and is optional.
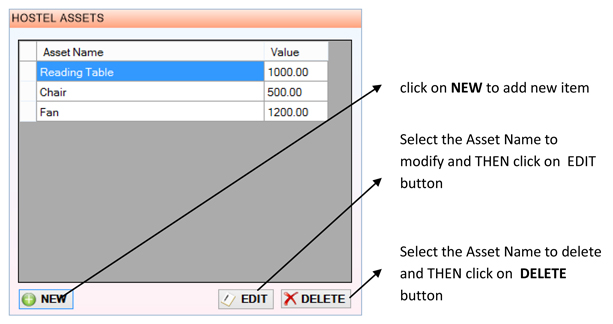
When you click on
NEW button popup screen appears as below
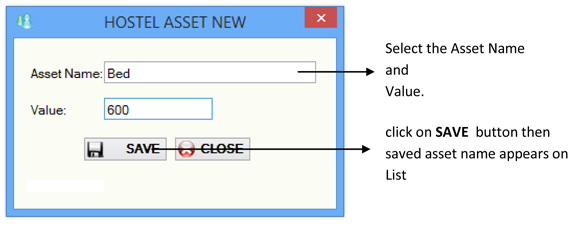
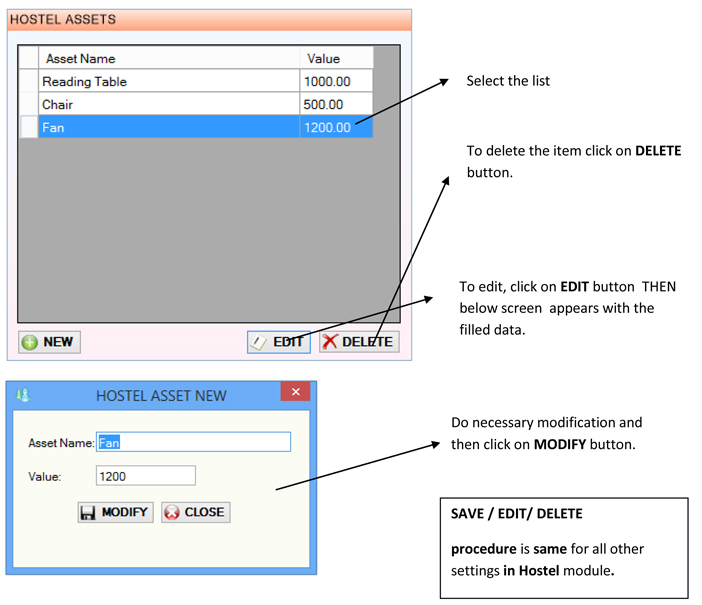
These are saved assets list and Lets see How to
Modify?
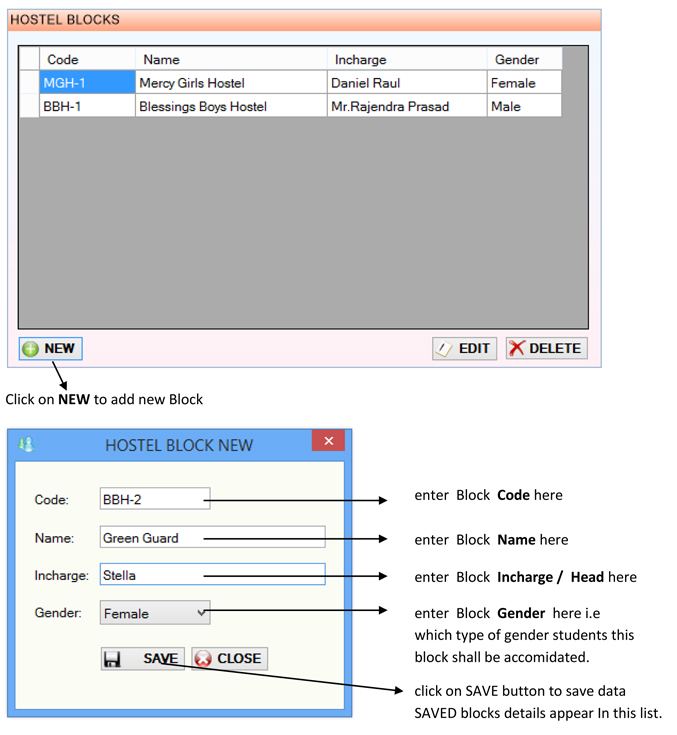
 BLOCKS
Hostel system room allocation divided into number of BLOCKS and each Block having number of rooms.
Lets configure Hostel Blocks.
Goto
SETTINGS ->HOSTEL -> BLOCKS
 How to Modify the Block?
Selec the Block which you want to Modify THEN click on EDIT button. Selected Block appear details appears in the popup screen.Do necessary modifications and click on MODIFY button.
How to Delete the Block?
Select the Block which you want to Delete THEN click on DELETE button.Alert message appears then click on Yes to delete.
ROOMS
Rooms are configured under the Block. Each room having number of beds .
Goto
SETTINGS ->HOSTEL -> ROOMS
 How to Modify the Room?
Selec the Room which you want to Modify THEN click on
EDIT button. Selected Room appear details appears in the popup screen.Do necessary modifications and click on MODIFY button.
How to Delete the Room?
Select the Room which you want to Delete THEN click on
DELETE button.Alert message appears then click on Yes to delete.
How to Add Bed?
Click on
ADD button which under the Bed Details grid.You can provide other information of the Bed by typing directly over the grid cells.
How to Delete Bed?
Click on
Delete button of the respective Bed on the Grid.
ROOM ASSETS
Now lets see what are the assets given to the room. Asset is the items which has some value and it could be any item.
Goto
SETTINGS ->HOSTEL -> ROOM ASSETS
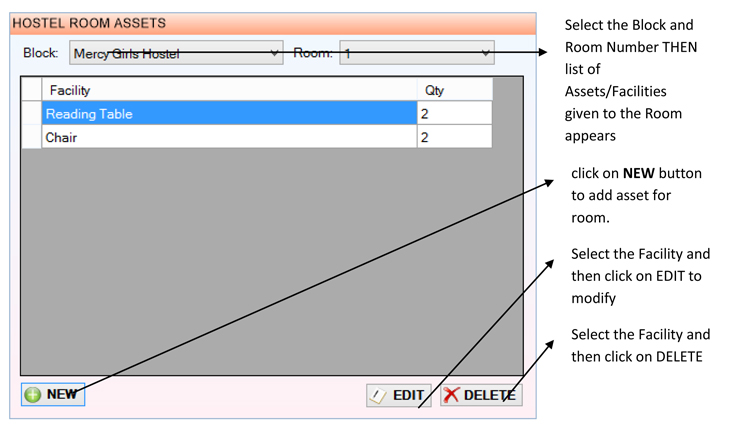
click on
NEW to get this screen.
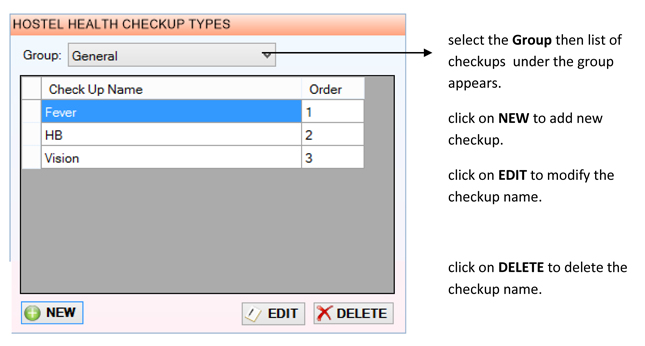
 HEALTH CHECKUP TYPES
What are the health checkup Types that you do in hostel to be listed and this list is used in transaction records.
 Configuration of Hostel Fee Strcuture
 (this configuration especially needed when you have different hostel categories for example Delux hostel, Normal Hostel etc)
All Residential students may or may not have the same fee structure and it depends on the facilities they need or class they study or hostel they accomidated.
Digital School provides complete solution for all types of fee structures in three steps
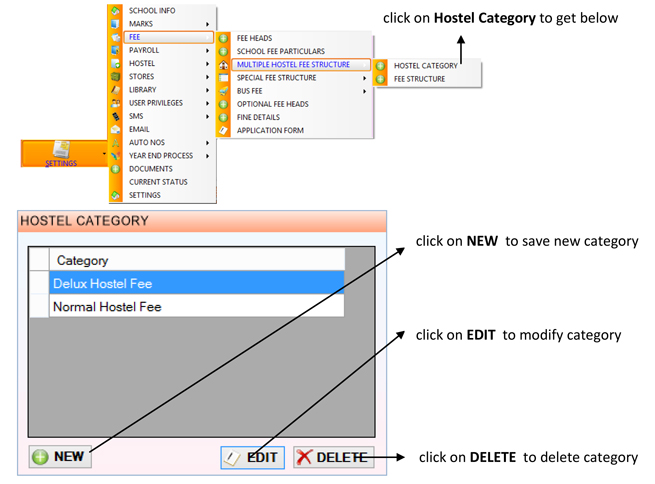
1. Create Hostel Category
2. Assigning Fee Heads for Hostel Category.
3. Apply the Hostel Category for student.
Lets see how
1. Create Hostel Category
Goto
SETTINGS->FEE->MULTI HOSTEL FEE STRUCTURE
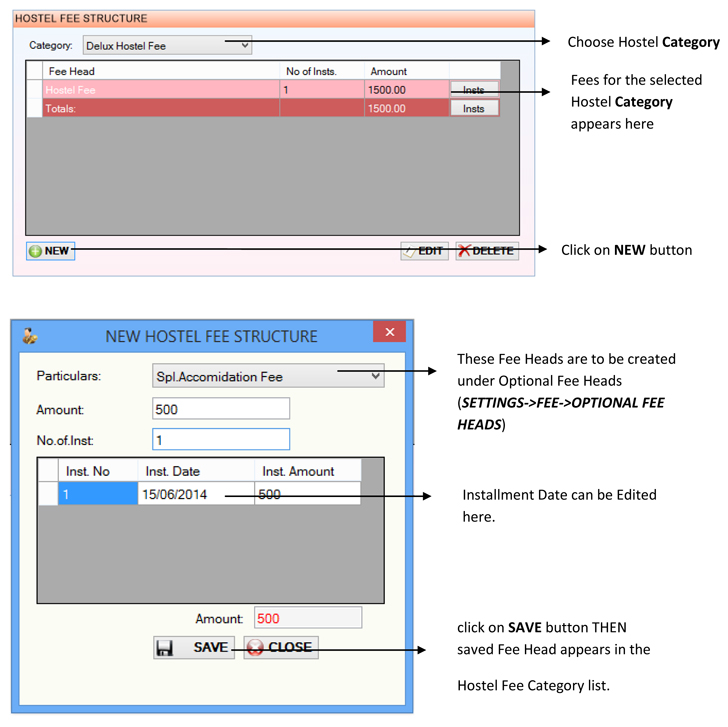
 2. Assigning Fee Heads for Hostel Category.
Goto
SETTINGS->FEE->MULTI HOSTEL FEE STRUCTURE THEN click on
FEE STRUCTURE
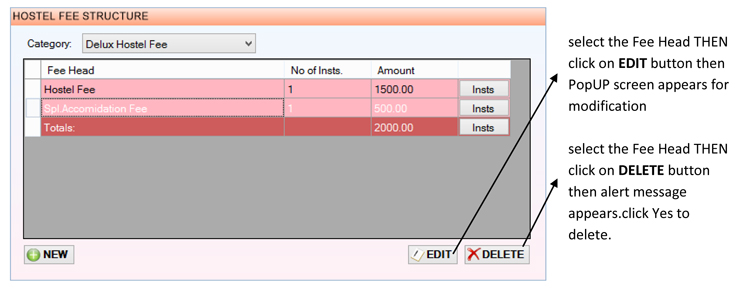
 How to EDIT or DELETE Hostel Fee Structure?
 3. Apply the Hostel Category for student.
 How to know the Fee structure of the student?
Goto
FEE -> REPORTS ->STUDENT FEE STRUCTURE
How to collect the Fee?
Goto
FEE -> FEE ENTRY
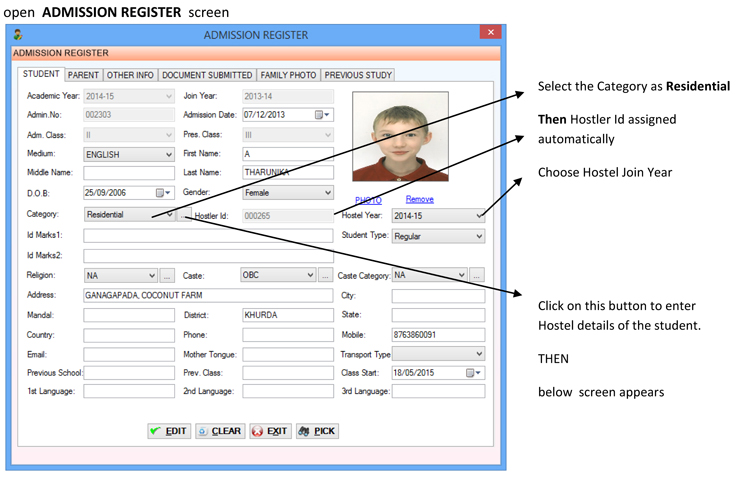
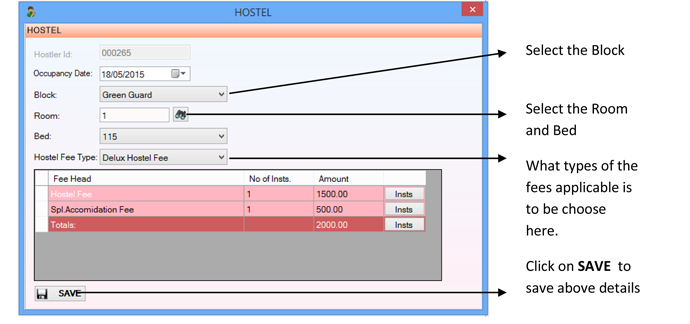
How the system will come to know whether the student is Residential or DayScholar?
Goto ADMISSION -> ADMISSION ENTRY
In this screen you have an option to choose Category DayScholar / Residential
If you choose Residential then you will have to enter other details like Hostel ID ,Hostel Joining Year, Room allotment and Fee structure details.
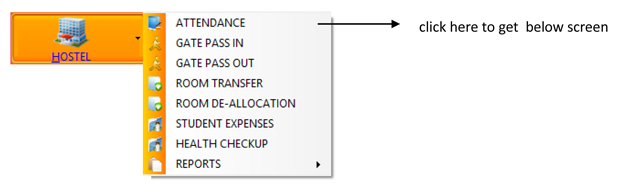
Class Attendance is different from Hostel Attendance.Lets see how to enter hostel attendance.
Goto
HOSTEL - >ATTENDANCE
 STUDENT WISE HOSTEL ABSENTS ENTRY SCEEN
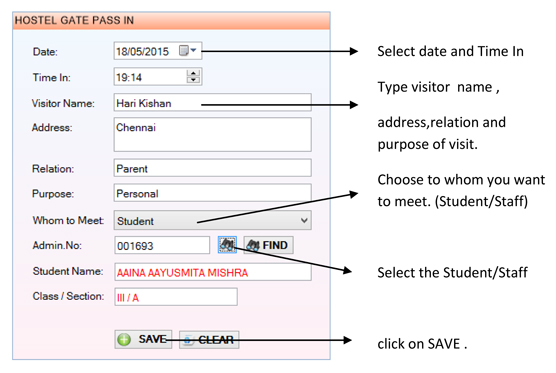
 Gate Pass
Digital School provides the automation of visitors information.
Goto
HOSTEL - > GATE PASS IN?
Goto
HOSTEL ->GATE PASS OUT
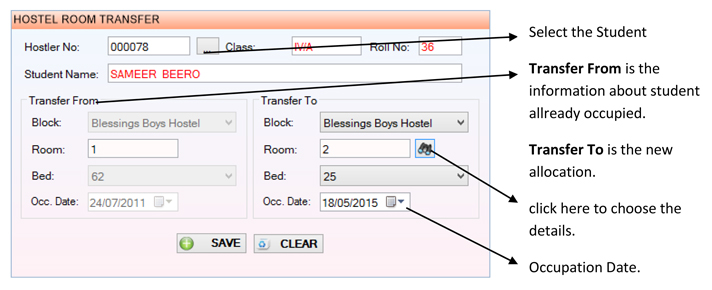
 How to Transfer the Student from one room to another or one bed to another?
Goto
HOSTEL -> ROOM TRANSFER
 How to cancel the room allotment for a student?
Goto
HOSTEL -> ROOM DE-ALLOCATION
Select the student then student details appear THEN click on SAVE button to save room –de allocation.
Student Expenses
School will have to maintain a record for student expenditures like medical , cafteria etc.
DigitalSchool provides the automation of Hostel expenses using this screen.
Goto
HOSTEL ->STUDENT EXPENSES
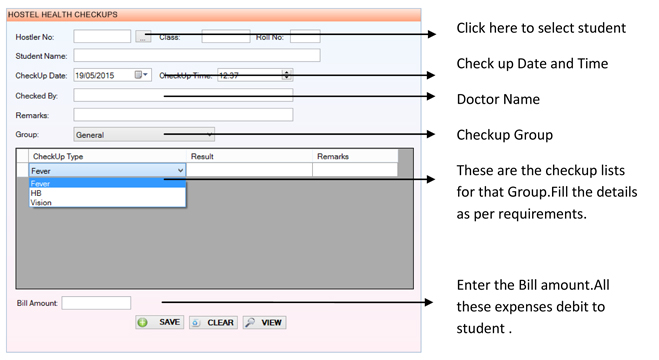
 DigitalSchoo provides automation student Health Record
Goto
HOSTEL -> HEALTH CHECKUPS
 Where do you see the Student Expnses Details?
Goto
HOSTEL -> REPORTS -> STUDENT EXPENSES
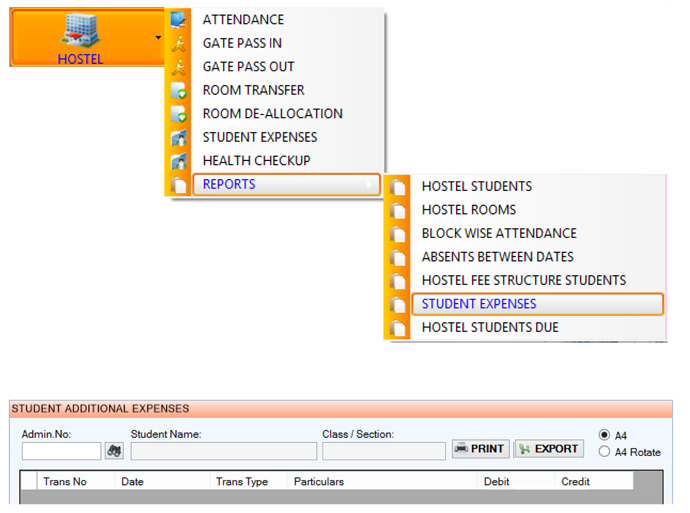
Credit column is for the amounts paid by the student.
Debit column is for the amount of the expenditure by the school.
Select the student THEN all the Additional Expenses details will appear on grid.
Report can be printed by Print button or export to Excel spreadsheet.
How doyou know list of students Hostel Block wise?
Goto
HOSTEL -> REPORTS -> HOSTEL STUDENTS
Where do you see the Rooms - Beds available and vacant?
Goto
HOSTEL -> REPORTS -> HOSTEL ROOMS
All the others reports are self explanatory.